home / software / tips and tricks / Create a desktop shortcut in a Visual studio 2010 Setup project.

Create a desktop shortcut in a Visual studio 2010 Setup project.

Updated:  04/04/2011 14:04 PM
Author:  Shiju Mathews

Status:    Resolved.


Add a Setup Project to your Solution
  • 1. Right click on your Solution and add a new project
  • 2. Select Other Project Types >> Setup and Deployment >> Visual studio installer.
  • 3. Add a name and Location to the project.
  • 4. Click OK

    Add item to Application Folder.

    Visual studio 2010 Setup project

  • 1. Right click on Application Folder>>ADD>>Project Output
  • 2. Select the appropriate project
  • 3. Select Primary Output on the selection area.
  • 4. Click OK

    Add item to User’s desktop Program Menu.
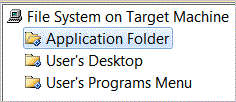
  • 1. In the left pane of the Setup/File System window click on Application Folder.
  • 2. Right click on the primary output/(active).
  • 3. Select short cut to Primary output.
  • 4. Drag the shortcut item to User’s desktop.
  • 5. Repeat steps 1 to 3
  • 6. Drag the shortcut item to User’s Program Menu.

    Change the Desktop icon
  • 1. Right click on the root folder(File system on Target machine). A drop down menu will popup.
  • 2. Slect custom folder on the botton of the menu. and name as Icon.
  • 3. Select an icon and copy that into the custon folder.
  • 4. Open User's desk top folder under root and select the shortcut. Right click on the shortcut and go to properties window.
  • 5. Go to properties Icon and select the icon on 'Icon' folder.
  • 6. Select User's programe menu and repeat steps 4 and 5.

    bulid the Application and Install on a machine.

  • Tags: Create a desktop shortcut in a Visual studio 2010 Setup project.
    Updated on: October 2024